Submit issues, contribute, or complain through the repo .
This is the guide for the PC-98 era games. The Windows era Touhou guide is here.
This guide focuses on using DOSBox-X and Neko Project II Kai for a relatively straightforward and consistent experience.
It does not cover:
The goal here is to get most users running their PC-98 Touhou games without too much headaches.
If you're looking for more advanced or alternative methods, other resources may be better suited for you.
Skip this section if you already have chosen your distro.
Most major distros and desktop environments should work well with this guide.
The author's only recommendation is to choose a well-known, widely-supported, and stable distro, which includes but is not limited to the following:
This guide has been personally tested by the author with the following distros on 64-bit x86 machines:
Before continuing, ensure you have the necessary graphics drivers and system firmware installed.
Consult your distro's documentation or other online resources for a proper setup (e.g., RPM Fusion for Nvidia drivers on Fedora, multilib repo on Arch, etc.).
Debian/Ubuntu/Linux Mint
sudo apt update && sudo apt upgradeFedora
sudo dnf updateArch Linux
sudo pacman -SyuThere exists several emulators of the PC-98 platform, many of which work very well on Windows or older hardware.
However, they're more likely to have issues and inconsistent behavior when running on Linux through Wine*, especially on certain distributions and setups.
Some, such as Anex86, T98-Next, and the original Neko Project II, are more than 20 years old!
Hence, this guide will mainly cover setup of two Linux-native emulators in detail:
All-around decent choice for most users
Cross-platform (Windows, Linux, macOS, DOS)
Great if you emulate other DOS systems
Included in many distros' repos
Can run the original game files
without an .hdi file.
Savestates have issues and more difficult to save and load
Considered a better choice for serious runs or more accurate emulation
Cross-platform as a RetroArch core
Great if you already use RetroArch
Can be built from source as xnp21kai_sdl,
and has an AUR package
Only supports .hdi and .fdi files
Savestates are easier to save and load
Install DOSBox-X through your package manager
Flatpak
Recommended option for most users*
flatpak install flathub com.dosbox_x.DOSBox-XDebian/Ubuntu/Linux Mint
sudo apt install dosbox-xFedora
sudo dnf copr enable rob72/DOSBox-Xsudo dnf install dosbox-xArch Linux
git clone https://aur.archlinux.org/dosbox-x.gitcd dosbox-x && less PKGBUILDmakepkg -si dosbox-x* The Flatpak version helps avoid most inconsistencies between distros and will always be the most up-to-date version, at the cost of using more storage and less file permissions by default.
DOSBox-X relies on a configuration file to apply the correct settings for various types of programs.
By default, DOSBox-X uses its own config file located at:
Non-Flatpak
~/.config/dosbox-x/dosbox-x-(version).confFlatpak
~/.var/app/com.dosbox_x.DOSBox-X/config/dosbox-x/dosbox-x-(version).conf
If the working directory contains a file named
dosbox-x.conf,
the settings that it contains will override the respective ones in the default config file.
As such, a ready-to-use config file is available for you to
download;
Simply save it to the same directory as your game files.
It is recommended that you look at its contents to have a basic understanding of what settings are applied, and adjust values for an optimal experience on your system.
If you prefer writing your own config file or directly editing the main config file, continue to the next sections.
Otherwise, download a font to the directory, then start running the games.
The working directory is where DOSBox-X will run. By default, DOSBox-X will ask you to choose a directory in your system.*
If you intend on using DOSBox-X only to play the PC-98 Touhou games,
set the directory with the .hdi files as the default
working directory in the default config file.
[dosbox]
working directory option = default
working directory default = /your/path/to/pc98touhou/
* If ran from the desktop. If it was ran in the terminal, DOSBox-X uses the current directory as the working directory.
To always start in fullscreen, set:
[sdl]
fullscreen = true
fullresolution = desktop
To ensure the graphics stay consistent, set:
[sdl]
output = openglpp

[render]
aspect = true
aspect_ratio = -1:-1To always enable PC-98 mode, set
[dosbox]
machine = pc98Some DOSBox-X packages (such as the Fedora COPR build) may not enable the US keyboard layout in PC-98 mode by default, since the PC-98 was originally meant to be used for Japanese keyboards.
This guide assumes most readers are using an US English or similar keyboard layout.
If your DOSBox-X package does not enable the US layout by default (check in the default config file), and you're using a US layout or similar, set
[pc98]
pc-98 force ibm keyboard layout = true
pc-98 force JIS keyboard layout = false
in either the default config file, or the provided
dosbox-x.conf file.
By default, the refresh rate of DOSBox-X is "unlocked". This means the program is not limited in the number of frames per second (fps) it can produce.
For the Touhou games, this means that they will only run around 56 to 57 fps* unless the following setting is applied:
[video]
forcerate = 60
Which will force the games to consistently run at 60 Hz (and thus 60 fps), if possible.
*
The refresh rate for the original PC-9800 series of computers is around
56.41 Hz.
This means gameplay can appear to be choppy on modern displays unless
adaptive sync has been enabled by the user.
The default CPU cycle count (3000) is too low for the
Touhou games, resulting in extremely slow gameplay.
Likewise, a value set too high can result in slowdowns as well, especially on machines with an older or slower CPU.
For a smooth experience across most modern machines, set
[cpu]
cycles = 30000
You may need to adjust the specific value depending on the capabilities of your machine's CPU. Older or weaker CPU's benefit from a lower cycle count.
The recommended lower and upper bound values are respectively
10000
and
72000.
If your hardware allows it,† set
[cpu]
core = dynamic_x86
† DOSBox-X used less of the CPU compared to "Normal" during testing by the author on their x86 machines with the same number of cycles.
This is especially helpful if you intend on always using only one
.hdi file* and do not want to always type the
commands by hand every time you start DOSBox-X.
Depending on how you're accessing the Touhou games, there are two formats that one can follow.
For more information, see the steps for running the games.
[autoexec]
IMGMOUNT A: TOUHOU.HDI
BOOT A:
Substitute TOUHOU.HDI
with the actual name of your .hdi file.
This is if you store the Touhou games outside an .hdi file
on your host system.
[autoexec]
MOUNT A: /path/to/touhou/games/
A:
Substitute /path/to/touhou/games/
with the actual path to your Touhou games.
There are many different ways to have NP21kai installed to your system.
Recommended option for most users
Great and stable choice, especially if you already use RetroArch for other games, but not great if you're tight on storage.
Modern UI navigation is biased towards controllers.
Good choice if you use an Arch-based system. Doesn't help if you don't use Arch, by the way.
However, the AUR package only helps automate building the program from source (see below).
Does not have a "stable" branch or binary releases. Will have bugs, missing features, and arbitrary behavior.
Not recommended for new Linux users, users who are unfamiliar with building programs from source, or those who preferstable programs.
Only choose this if you absolutely desire so, or have no other options.
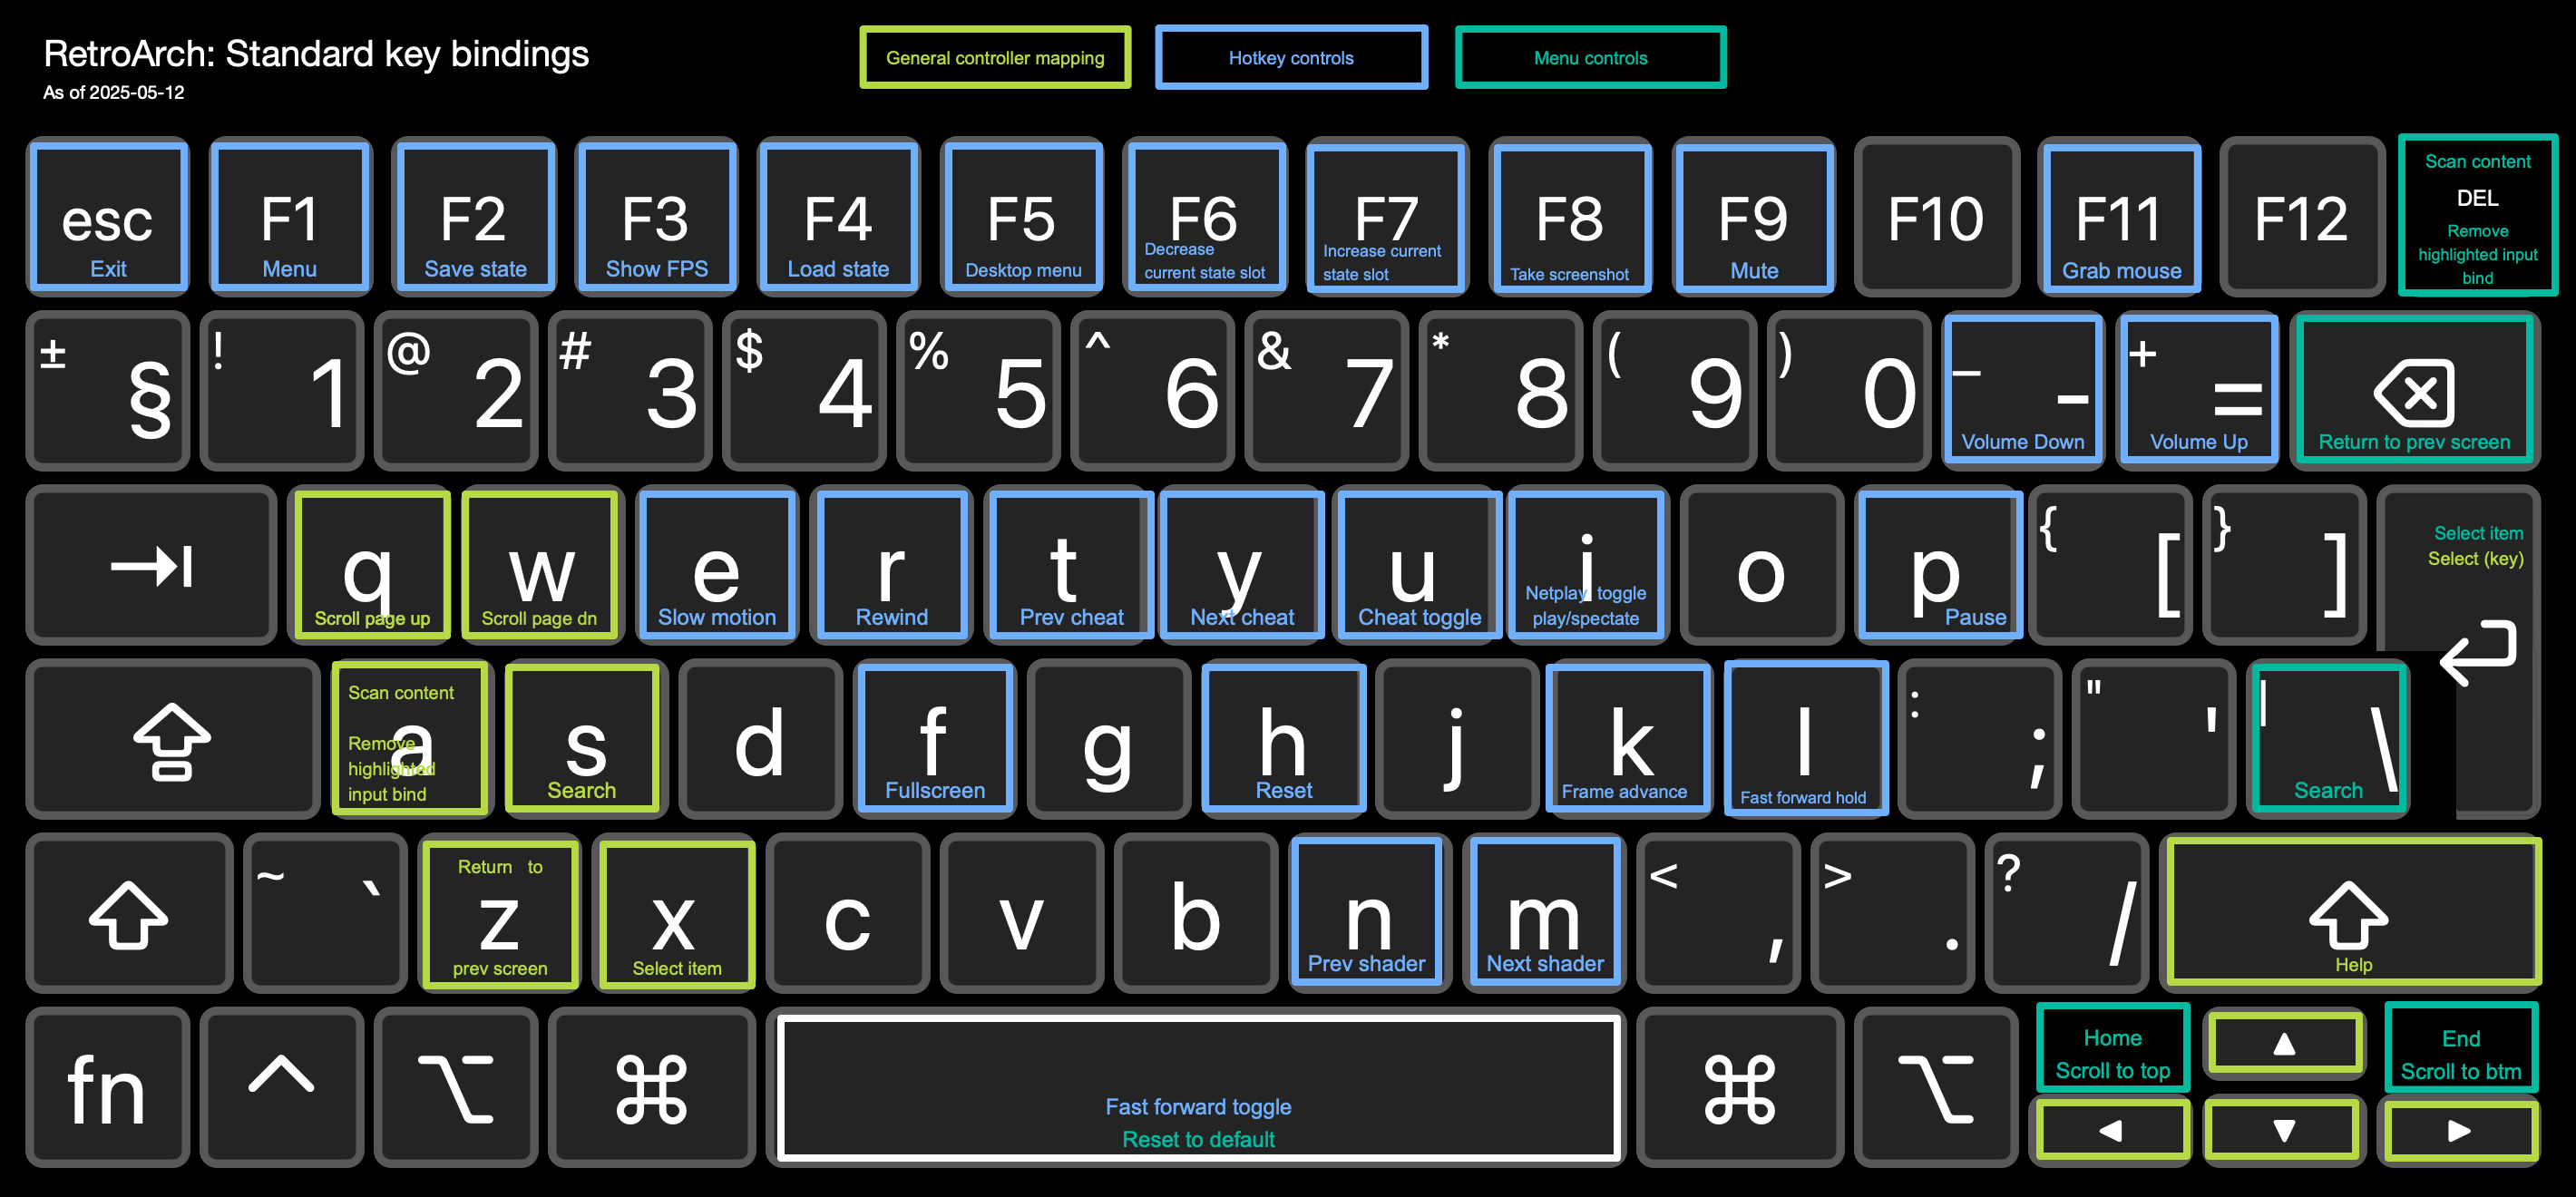
You may want to familiarize yourself with the RetroArch standard keyboard bindings before continuing to this section.
Install RetroArch. Choose the version that suits you the most.
This guide recommends the latest stable version for most users for consistency and ease of use.
Flatpak
Recommended for most users
flatpak install flathub org.libretro.RetroArchUbuntu/Linux Mint
sudo add-apt-repository ppa:libretro/stable && sudo apt-get update && sudo apt-get install retroarchFedora
The default installation of RetroArch also installs a few emulators as weak dependencies. The command below installs RetroArch without those emulators.
sudo dnf install retroarch retroarch-assets retroarch-database retroarch-filters --setopt=install_weak_deps=FalseArch Linux (Wiki)
sudo pacman -Sy retroarch retroarch-assets-xmb retroarch-assets-ozoneRun RetroArch either by GUI or in the terminal.
Flatpak
flatpak run org.libretro.RetroArchNon-Flatpak
retroarchIf you installed RetroArch through your distro's package manager, follow the next set of instructions. Otherwise you can skip this part.
In "Settings" → "User Interface" → "Menu Item Visibility", set
Show 'Online Updater' and
Show 'Core Downloader' to ON.
Close RetroArch (Esc key twice), then navigate to
~/.config/retroarch.
Edit the following settings in retroarch.cfg, as
this will allow you to install cores without requiring root privileges.
libretro_directory = "~/.config/retroarch/cores"libretro_info_path = "~/.config/retroarch/cores/info"Launch RetroArch again and continue with the following steps.
In the Main Menu, select (Enter/Return key) "Load Core", then "Download Core"
Scroll down the list to NEC - PC-98 (Neko Project II Kai), then select to install it.
If you're new to Arch, please consider first reading the Arch Wiki article on how to install packages from the AUR, along with the article on makepkg.
Install gtk2 from the AUR
git clone https://aur.archlinux.org/gtk2.gitcd gtk2 && less PKGBUILDmakepkg -si gtk2Clone the np21kai repo from the AUR
git clone https://aur.archlinux.org/np2kai-git.gitCheck the PKGBUILD for security, and modify the CMake flags if desired. *
cd np2kai-git && less PKGBUILDmakepkg -si np21kaiProceed with adjusting the necessary settings.
* Currently as of writing, the PKGBUILD will create 6 versions of np21kai by default
xnp2kaixnp21kai_sdlxnp21kai_HAXM_sdland their SDL equivalents with the _sdl suffix at the end.
The steps below may not be the most up-to-date. Steps are highly subject to change. This section is the most flawed part of the guide.
Referenced from the original README document and the AUR PKGBUILD file.
Install the required programs and libraries
Installing these libraries may cause some of your programs or dependencies to be automatically removed. Always check what packages will be installed and removed before confirmation.
sudo apt install git build-essential cmake ninja-build nasm libx11-dev libglib2.0-dev libgtk2.0-dev libsdl2-dev
				libsdl2-mixer-dev libsdl2-ttf-dev libsdl1.2-dev libsdl-mixer1.2-dev libsdl-ttf2.0-dev libusb-1.0-0-dev libfreetype-dev
				libfontconfig1-dev libssl-dev
sudo dnf group install "development-tools"
sudo dnf install gcc-c++ cmake ninja-build nasm /usr/lib64/libusb.so SDL-devel SDL_mixer-devel SDL_ttf-devel SDL2-devel SDL2_mixer-devel SDL2_ttf-devel gtk2-devel libX11-devel fontconfig-devel freetype-devel sdl2-compat-devel
Clone the np21kai repo
git clone https://github.com/AZO234/NP2kai.gitNavigate to the repo and prepare for building
cd NP2kaiAlways check commands before running them! THIS GUIDE AND ITS AUTHOR IS NOT RESPONSIBLE FOR ANY DAMAGES INCURRED.
curl -O https://github.com/AZO234/NP2kai/commit/3d23274eefcf9c494358662539c29eebd8996cbf.patch && \
curl -O https://github.com/AZO234/NP2kai/commit/697fac371b414212526aae25e7c9774f167f4ef3.patch && \
curl -O https://github.com/amuramatsu/NP2kai/commit/ad781a4db34bc2364a377cc7bd90b3b99fea1459.patch && \
patch -p1 -i 3d23274eefcf9c494358662539c29eebd8996cbf.patch && \
patch -p1 -i 697fac371b414212526aae25e7c9774f167f4ef3.patch && \
patch -p1 -i ad781a4db34bc2364a377cc7bd90b3b99fea1459.patch && \
sed '/set(COMMON_C_CXX_FLAGS/s/^/#/g' -i CMakeLists.txt && \
sed 's|target_include_directories(NP2kai_SDL2_base INTERFACE|& ${SDL_INCLUDE_DIRS} ${SDL_TTF_INCLUDE_DIRS}|g' -i CMakeLists.txt && \
sed 's|SDL2_ttf/SDL_ttf.h|SDL2/SDL_ttf.h|g' -i sdl/fontmng.c -i x/fontmng.c && \
sed '1i#include <SDL2/SDL_ttf.h>' -i sdl/fontmng.c && \
sed 's|#include <SDL3/SDL.h>|#include <SDL2/SDL.h>|g' -i compiler_base.h
If patch tells you that previous patches were detected, enter y.
Create the build directory
and create the CMake files.
mkdir buildRecommended for most users, for simplicity ;)
cmake . -B build -DBUILD_X=ON
This will create xnp21kai_sdl (legacy X11 support),
and sdlnp21kai
(more modern version used by RetroArch).
cmake -S . -B build -DBUILD_X=ONDo this only if you want to mirror the AUR on a non-Arch distro or you want all versions, possibly for your own testing.
You can also use the command below as a reference for
fine-tuning (such as installing to ~/.local/bin).
cmake -S . -B build \
	-DBUILD_X=ON \
	-DBUILD_I286=ON \
	-DBUILD_HAXM=ON \
	-DUSE_X=ON \
	-DUSE_SDL=2 \
	-DUSE_HAXM=OFF \
	-DUSE_ASYNCCPU=ON \
	-DUSE_VST3SDK=OFF \
	-DCMAKE_C_FLAGS="-Wno-implicit-function-declaration -Wno-incompatible-pointer-types -Wno-int-conversion" \
	-DCMAKE_CXX_FLAGS="-fno-sized-deallocation" \
	-G Ninja
The following table contains not all, but noteworthy CMake options
CMake flag (with -D prefix) |
Default value with just cmake -D BUILD_X=ON |
Created program(s) if set to ON |
Description |
|---|---|---|---|
CMAKE_INSTALL_PREFIX |
/usr/local |
Programs will be installed to /usr/local/bin when the install command is ran.The AUR installs them to /usr/bin instead.
|
|
BUILD_X |
ON |
x* |
Creates X11 versions of the following programs. |
BUILD_SDL |
ON |
sdl* |
Creates Wayland versions of the following programs. |
USE_SDL |
2 |
Uses SDL2 for the SDL versions of the programs. | |
BUILD_I286 |
OFF |
xnp2kai,
sdlnp2kai
|
If set to ON, creates the i286 version,
which can only run 16-bit operating systems and programs.
|
BUILD_HAXM |
OFF |
xnp21kai_ HAXM_sdl,sdlnp21kai_HAXM
|
If set to ON, creates a IA32 version with
HAXM, which uses hardware virtualization.Only use this if you want to, and have an Intel CPU that supports HAXM. |
Build the program. Errors and warnings are normal.
Recent testing suggests that you might only be able to
build the program once,
with subsequent attempts ending with the error
ninja: build stopped: subcommand failed.
build/cd build/cmake --build .build/cmake --build buildInstall the program(s) to the system
build/)sudo make installbuild/sudo cmake --install buildxnp21kai_sdlsdlnp21kai
†
sdlnp21kai has some differences compared to
xnp21kai_sdl,
but the most important are as follows:
As of writing, all variants of sdlnp21kai can only
be ran from the terminal,
while all variants of xnp21kai_sdl have
.desktop shortcuts after using the
sudo make install command.
The menu bar is hidden until you press
F11
sdlnp21kai can properly scale up to fullscreen,
but xnp21kai_sdl cannot.
Inversely, xnp21kai_sdl is able to have a few
different window sizes, while sdlnp21kai cannot.
sdlnp21kai uses more resources.
Or at least can make your computer's fan spin up.
Go back* to the previous menu and select the respective core. On the Main Menu, "Start Core" will be in place of "Load Core".
Start the core without content and press
F1 to open the Quick Menu
Select "Core Options", and apply the following settings:
The following two settings are required for smooth gameplay:
5216Optional, but more authentic (or loud) music experience:
PC9801-26K+86100100100Default (or fmgen if available)Go back and restart the core.
Install the necessary font and ROM files
* Backspace key on keyboard
In the menu bar, adjust these settings for a smooth experience. To apply them, hit "Reset" in "Emulator"
2.4576MHz x 52PC-9801VX44100 kHz20 msPC9801-8616.6 MB
Install the
necessary font and ROM files
to ~/.config/xnp21kai_sdl/
* The default multiplier of 20 should be enough for most systems, but can result in slowdowns on sections with large amount of enemies or danmaku.
†
Testing by the author in xnp21kai_sdl has shown that a buffer of
100 ms
or more will result in noticeable sound delay,
especially for sound effects.
The process is similar to xnp21kai_sdl, except for the following differences.
The maximum CPU multiplier is
32
The sampling rate for 44100 kHz
is visually rounded down to
44KHz
Also note that for some reason, sdlnp21kai does not save its settings by default, so you may have to manually create a config folder for it.
cd ~/.configmkdir sdlnp21kaitouch np21kai.cfgThis will also be relevant for the next section.
You may need to install some PC-98 ROM files for your emulator to work properly. These can be found elsewhere online.
Neko Project II kai and DOSBox-X both already include most of the necessary ROM files for basic operations.
BIOS.ROMITF.ROMSOUND.ROMFONT.ROM (see next section)For the Touhou games, you don't need to install these ROM files. However...
Both Neko Project II Kai and DOSBox-X require a font file in order to properly display Japanese characters.
Some popular font files are available to download from here:
Recommended for DOSBox-X
* The FREECG98 font does not work with Neko Project II Kai.
Recommended for Neko Project II Kai.
If you have the original ROM files, simply copy/move them to the same directory as your PC-98 Touhou game file(s).
Otherwise, DOSBox-X already includes FREECG98.BMP
for convenience.
To use a different compatible font:
Move/copy the file to the working directory.
Edit the config file so that under the
[pc98] section,
pc-98 anex86 font
is set to the font's filename.
Navigate to the RetroArch system folder.
Flatpak~/.var/app/org.libretro.RetroArch/config/retroarch/system/~/.config/retroarch/system/Create a directory called np2kai.
Copy/move the files to to np2kai.
If you're using a compatible font besides FONT.ROM,
rename the file to font.bmp
(case-insensitive).
Copy/move the font and ROM files to
~/.config/xnp21kai_sdl.
If you are using a compatible font besides FONT.ROM,
there are two possible options:
Edit fontfile
in xnp21kai_sdlrc
to the absolute filepath of the font.
Copy/move the font file to
~/.config/xnp21kai_sdl.
Rename the file to font.bmp
(case-insensitive).
Similar to the process for xnp21kai_sdl,
but the directory is
~/.config/sdlnp21kai,
and the configuration file is
np21kai.cfg.
This guide assumes that most readers have acquired their copies of
the PC-98 Touhou games in the form of .hdi files.
While the author has tested running the games from the original "loose" files (such as those in the compilation disc), with DOSBox-X, most readers are unlikely to be in a similar situation.
As such, this guide assumes the reader already knows how
to use DOS commands such as
cd and
dir to understand terms such as
"navigate to your desired game's directory".
Regardless, it is highly recommended that you store your game files in a directory named "Games" or "Touhou" for ease of rememberance.
If you are running Lotus Land Story or Mystic Square for the first time, you'll need to configure the sound.
After running the game, there will be a screen to configure the music. Select the first option (ステレオFM音源) for a full FM synthesis experience.
Another screen will appear to configure the sound effects. Select the first option (FM音源) for emulator compatability and a more authentic experience.
The difference between the two games for this step is that one has Gengetsu in the background and Shinki in the other. Wow, this is elite ball knowledge.
The A: drive will be used as an example
drive letter, but you can use any letter from the English alphabet, so
long as it isn't already mounted.
If prompted, select the directory with your game files as your working directory.
Wait for DOSBox-X to finish loading*, then run these the following commands† in DOSBox-X, depending on how your Touhou games are stored.
IMGMOUNT A: /path/to/TOUHOU.HDIBOOT A:
Substitute TOUHOU.HDI
with the actual filename‡ of the
.hdi file you want to load.
MOUNT A: /path/to/touhou/gamesA:The most common form, these should immediately boot into the game or a graphical menu.
Navigate to your desired game's directory, and run
GAME.BAT
Navigate to your desired game's directory, and run
GAME.BAT
Post-setup information.
See this section for information about savestates.
See this section
on how to remove or change the .hdi file
*
You should see a screen with
Z:¥>
as the prompt.
If not, check your dosbox-x.conf file to see that
machine = pc98.
† The commands themselves are case-insensitive and can be typed in lowecase. Mounting and unmounting drives do not require a colon after the drive letter as well. The following examples are valid commands.
Mount a directory to the A: drive:
mount a /path/to/touhou
Mount an .hdi to the B: drive:
mount b /path/to/touhou.hdi
Switch to the C: drive without booting anything
c:
Unmounting the D: drive
MoUNt -u D
‡ The path and filename is case-sensitive!
Navigate to the directory folder with your .hdi(s)
and config file, then run
Non-Flatpak:
dosbox-x
Flatpak:
flatpak run com.dosbox_x.DOSBox-X
In the Main Menu, select "Load Core", then "NEC - PC-98 (Neko Project II Kai)"
If it's your first time loading the .hdi file:
Select "Load Content"
Navigate to to directory with the file and select it.
If you have loaded the .hdi file before:
Select "Playlists", then "History".
Select the .hdi file, then run it.
This should immediately boot into the game or a graphical menu.
Navigate to your desired game's directory, and run
GAME.BAT
See this section for information about savestates.
To remove the .hdi file,
go into the Quick Menu and select "Close Content".
In the menu bar, select "HardDisk"
Choose IDE0-0*, then "Open"
Find your Touhou .hdi file and open it.
Reset the emulator.
This should immediately boot into the game or a graphical menu.
Navigate to your desired game's directory, and run
GAME.BAT
To remove† the .hdi,
simply choose "Remove" on the "hard disk" the .hdi
is located in and reset the emulator.
See this section for information about savestates.
*
If only IDE0-0 or IDE0-1 is loaded,
that will be the default drive.
If both are loaded, xnp21kai_sdl
will prompt you to choose a drive to boot after the memory check.
†
To switch to another .hdi, simply choose "Open" again.
Similar to xnp21kai_sdl,
but with the following differences:
IDE1
and
IDE2
instead of
IDE0-0
and
IDE0-1,
respectively.
Savestates allow you to create a "snapshot" of your PC-98 system
at any given time, so long as your .hdi
file still exists in the same location as when you last used it,
and there's enough open slots left.
In the context of the PC-98 Touhou games, savestates are useful for applications such as continuing where you left off in-game, or practicing certain sections.
Savestates in DOSBox-X are known to have issues, such as buggy behavior after loading.
For most of the Touhou games, the author recommends pausing the gamebefore creating a savestate.
To create a savestate, navigate to "Capture",
then click on "Save state"
F12 + S
You'll be prompted to give it a unique name.*
To store more than one savestate, navigate† to an empty slot in "Select save slot" under "Capture". DOSBox-X has 100 empty slots by default.
To remove a slot's content without writing any data to it, click "Remove state in slot" under "Select save slot" after you've already selected the slot that you want to clear.
* This will overwrite all data in the current selected save slot, so make sure to navigate to the next empty slot if you want to create a separate save state.
†
For faster navigation, use
F12 + . for the next slot,
and
F12 + ,
for the previous slot;
both are relative to the current selected save slot.
DOSBox-X allows for automatic and periodic creations of savestates. This means you can have something akin to "auto-save" in most modern video games.
To start creating auto-saves, navigate to "Capture", then "Auto-save settings".
Below is a table of possible settings.
Note that x, y, z are to be substituted
for positive integer values.
| Time interval (secs)* | Start slot | End slot | Savestates created |
|---|---|---|---|
0 |
0 |
0 |
Default setting, does nothing regardless of the value of the time interval. |
z |
x |
y |
Iteratively create new savestates in slots
x through y, inclusive,
every z seconds.If the current slot is within the range, saving will start on that slot. |
z |
x |
0 |
Create a savestate at slot
x every z seconds.
|
z |
0 |
0 |
Create a savestate at the current slot
†
every z seconds.
|
z |
0 |
y |
Create a savestate from
the current slot†
to slot y, inclusive,
every z seconds.
|
For the Touhou games, since this guide assumes most people are not directly using the original game files, we can ignore settings for individual programs.
*
To reduce the possibility of your system slowing down,
it's recommended that the shortest interval for
general use be 60 seconds.
Please also note that this means the game will briefly pause
when a new savestate is being created.
† Please ensure that you're not overwriting any slots you want to keep or manually save!
.hdi file
when you created that savestate.
To load a savestate, select "Load state"
F12 + L
on the selected slot that you want to load it from.
Savestates can be stored in up to 1000 slots.
Before loading a savestate,
you must be currently running the same .hdi file
that you want to load the savestate from.
Otherwise you'll only see a black screen.
F2
to quickly create a savestate to the current slot.
F4
to quickly load a savestate from the current slot.
F6
and F7to navigate between slots.
A thumbnail of the slot's savestate will be shown for reference.
Go to "Save States", then click on "Save State" to create a savestate to the current slot.
To load a savestate from the current slot, click on "Load State".
To navigate between slots, enter "State Slot" and navigate to your desired slot.
To enable savestates, add the following line to
xnp21kai_sdlrc (or np21kai.cfg)
STATSAVE = true
(Re)start the program.
There should be a new section in the menu bar titled STAT.
Under that, you can save and load two slots.
"Restarting the DOSBox-X instance" from the menu will make it
unable to mount any .hdi file in your working
directory until you close the program.
If you want to use the same .hdi file,
Reboot the guest system (F12+B).
If you want to use a different .hdi file in
the same working directory, reset the virtual machine
(F12+R).
To unmount a drive while in the shell:
MOUNT -U A:
If you only use one .hdi file and only use DOSBox-X
for that purpose, it's useful to make DOSBox-X automatically
load it every time
you run DOSBox-X.
By default, pressing the Esc key twice will quit RetroArch!
It's recommended to set your .hdi file(s)
as favorites to access them faster in the future.
There are two ways of adding them to your favorites:
Quick Menu → Add to Favorites (while running)
Playlist
→ History
→ your .hdi file(s)
→ Add to Favorites
Your window position and size is not remembered!
Your last used .hdi file, however, is remembered!
When ran from the terminal, closing the terminal emulator will also close xnp21kai_sdl
There has been issues where closing the window via the "X" button may not cause the program to stop running.
If that happens, kill the program via the terminal or System Monitor.
Make sure to run this command before using older emulators (Neko Project II, Anex86, T98-Next, etc.) with Wine:
winetricks ddr=gdiThis section is under expansion. Submit issues and fixes through the repo .
Right click on the title bar of the window.
Go to "More Actions" → "Special Window actions".
In the new window, click "Add property" in the bottom left. Find "Fullscreen" in the list and add it.
Go back and make sure you set "Fullscreen" to "Yes".
If you have multiple monitors, and the program launches on the wrong one, you can also add "screen" property.
The changed settings can be found under System Settings → "Window Management" → "Window Rules" → Pencil icon of "Window settings for com.libretro.RetroArch".
Try stopping the program and run it again.
(Ctrl+C if launched from the terminal)
Includes errors being thrown even when pressing
Ctrl+C in the terminal.
Unfortunately, this is arbitrary behavior that
there is no exact solution to so far.
Testing by the author suggests that directly running
xnp21kai_sdl from /usr/local/bin/
may solve this issue if it repeatedly happens.
Unfortunately there is currently no option to scale up the display.
The author thanks the following for their support: